Pikocon
Pikocon - Construction WordPress Theme.
Pikocon - A WordPress theme, which is built base on 2016 design trending. With suitable shop, with smoothly elegant layout.
For Wordpress Beginners
If you're new to wordpress it can be a lot to take in all at once. Thankfully the Internet is an amazing place for learning. Here are some great links to get you through the basics and well on your way to loving wordpress.
Great training videos, highly recommend starting here.
Video link
Step by Step tutorials for beginner to pro Wordpress codex.
http://codex.wordpress.org/Getting_Started_with_WordPress
1.1 Few words on start
To install this theme you must have a working version of WordPress already installed. Make sure your installed Wordpress version is 4.4 or higher. You also need to have PHP 5.2.4 or higher versions (recommended is php 5.3+) and MySQL 5.0 to function correctly. If you need help installing WordPress, follow the instructions in WordPress Codex
Pikocon is an excellent WordPress theme for multipupose and professional website experience. A cool header slider with responsive layout design this theme has it all.. Be sure that with our new theme you can easily customize whatever you want on page. Please also note that all those options are amazingly easy to use.
1.2 Package from themeforest
At first, after purchasing this theme please download the package from Themeforest. All you need to do that is pikocon have your use over your login name in right top corner (of course after you’re logged in Themeforest) and then click Download. Here you will find all the items that you have purchased. It looks exactly just as the diagram next to.
In the next step click the Download > Main File(s) button next to pikocon theme and save package on your computer.
In the package you can find things like documentation, license, zipped file with theme files and folder with theme files called Pikocon. Please unpack the whole package after downloading it from Themeforest.
1.3 Install via WordPress
Following some steps below, you can completely install Piko Construction in few minutes.
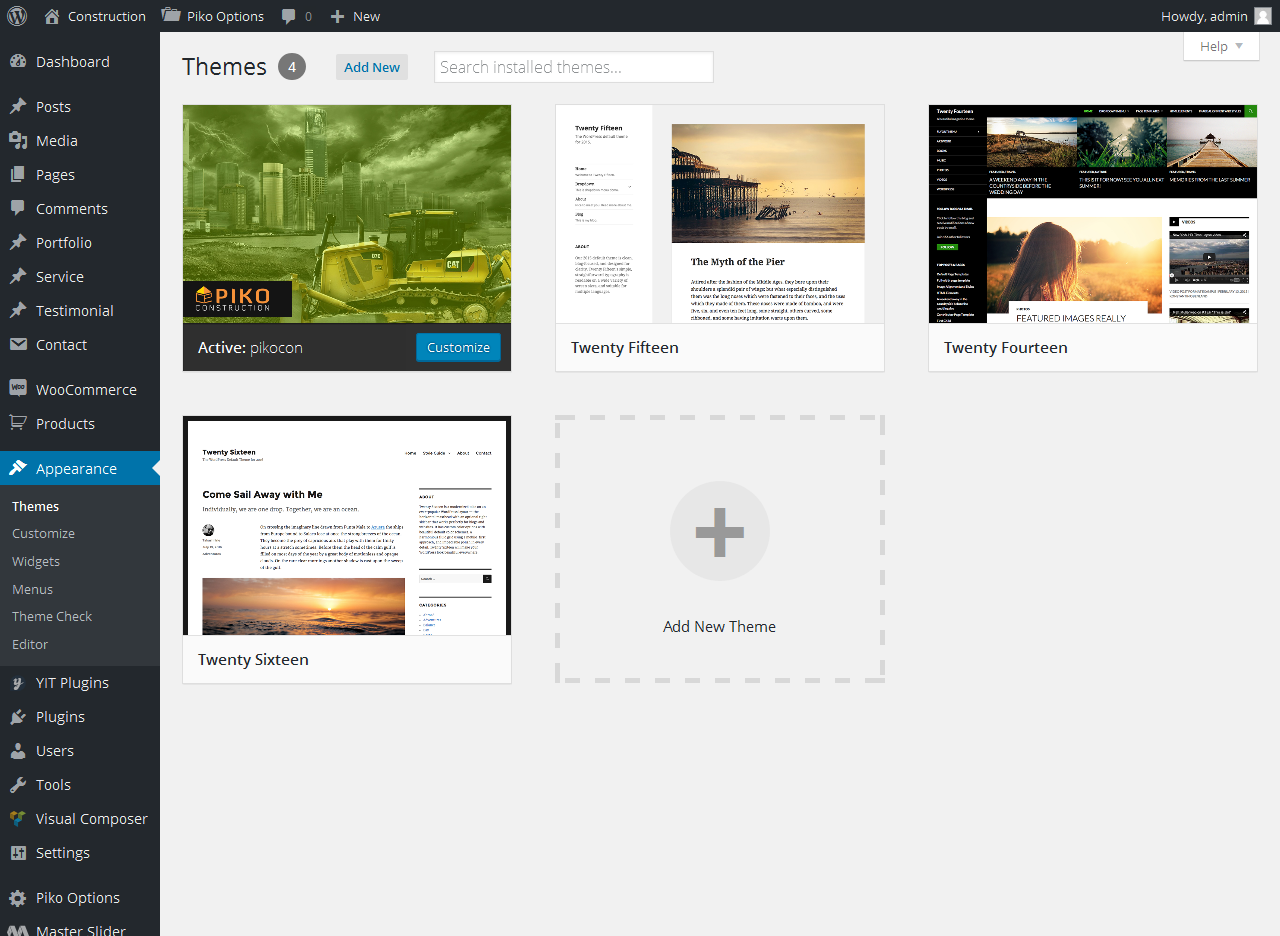
Step 1: After getting the installation zip file of pikocon, you should navigate to Appearance >>> Theme.
Step 2: Click add new and then wait while the theme uploaded and installed.
Step 3: Click to activate it.
Step 4: Done
1.4 Installation issues
Learn how to handle PHP issues during the installation process.
pikocon of the time installation problems are due to limited resources, for example on shared hosting servers. Here's an overview of the PHP configuration settings you should check and increase, if needed.
|
Setting |
Description |
post_max_size |
Data in a single form submission using the POST method. |
upload_max_filesize |
Size of an individual file uploaded. |
max_execution_time |
Time in seconds a script is allowed to run before it is terminated by the parser. |
You may need to allocate resources for PHP by php.ini file directly. If this is not possible, you can try setting the PHP settings through a .htaccess file on your webserver. Though this also depends on your hosting server, if it allows the usage of .htaccess overrides.
To change the PHP configuration through the php.ini file, use the following syntax.
# example of recommended settings
post_max_size = 8M
upload_max_filesize = 8M
max_execution_time = 60
To change the PHP configuration through a .htaccess file, use the following syntax.
# example of recommended settings
php_value post_max_size 8M
php_value upload_max_filesize 8M
php_value max_execution_time 60
1.5 Installation vai FTP
At first please make sure that you have unpacked the whole package shown in the last point. This is very important! You can complete installation in two different ways:
Uploading pikocon via FTP to Wordpress
Download the zipped theme pack to your local computer from themeforest and extract the ZIP file contents to a folder on your local computer.
- Log into your hosting space via an FTP software
- Unzip the Pikocon.zip file and ONLY use the extracted pikocon theme folder
- Upload the extracted pikocon theme folder into wp-content >>> themes folder
- Activate the newly installed theme. Go to Appearance >>> Themes and activate it.
All your data in the database are safe because after updating theme files doesn`t change anything in the database. Please however always make a backup of your files & database.
IMPORTANT!!! After theme installation, at the top you have box with information about required and optional plugins. To install them and activate, please navigate to Appearance > Install Plugins section, and install only NECESSARY PLUGINS. We included plugins like: Master Slider (Recommended), Contact Form 7 (Recommended), Visual Composer(required), Woocommerce (Recommended), and Woocommerce quick view (Recommended),.

Plugin Installation & Update Notification
When you install Pikocon or update Pikocon, you will receive a WordPress notification message letting you know to install or update the required and recommended plugins. Please follow the on screen prompts to install, activate or update.IMPORTANT: If you plan to use bundled premium plugins in another theme, you have to purchase license on CodeCanyon. Links to plugin pages can be found in Appearance > Install Plugins by clicking on plugin name.
For Pikocon, we created two different ways to upload Pikocon content.
- The first one is 1 Click Pikocon Install,
- WordPress. Install plugin WordPress Importer.
One click demo import
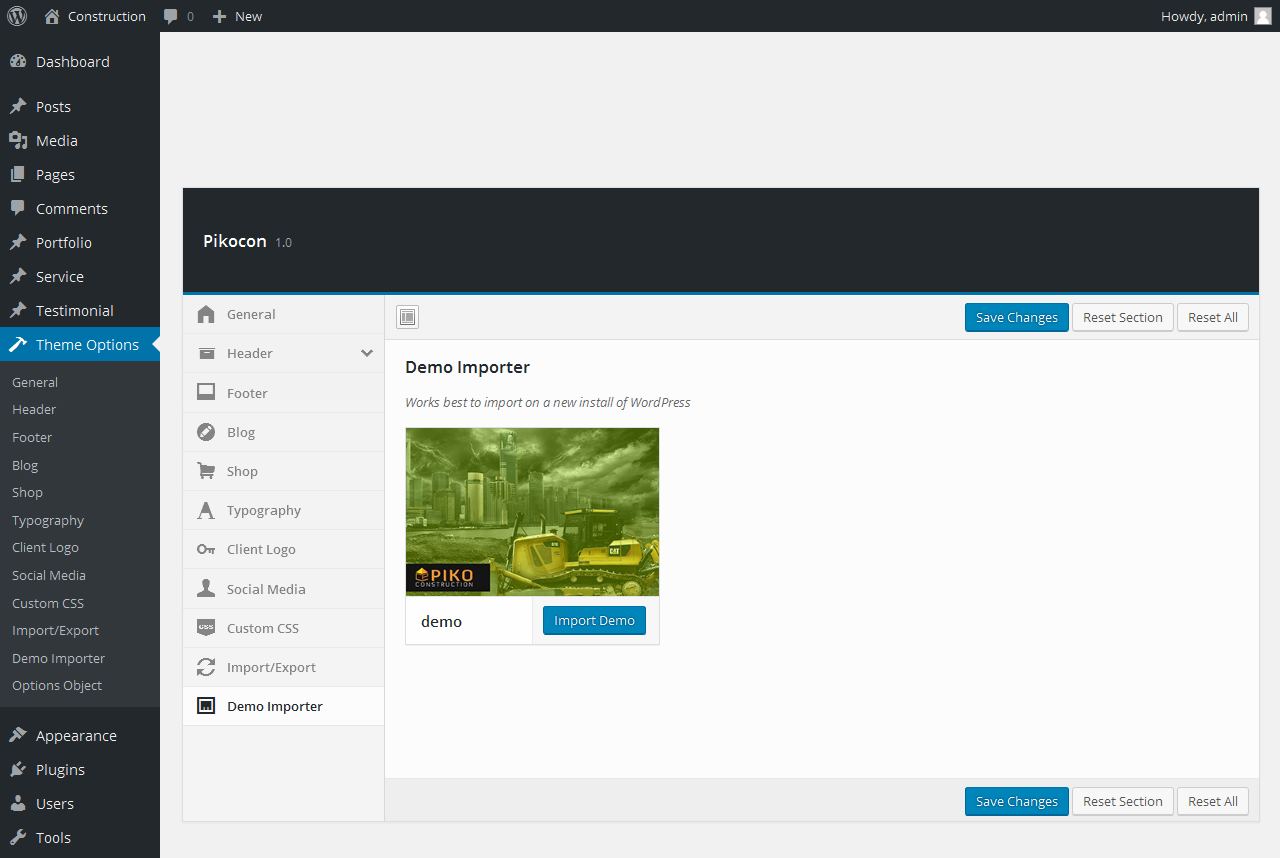
If you want to import our content like demo, dont' worry because you need to follow 3 simple steps:
Step 1- Admin Bar you see the Theme Option
Step 2- Click to Theme Option >>> Demo Importer
Step 3- Click to "Import Demo"
Step 4-Save changes. Done! All demo content has been automatically imported
Wordpres Importer
If you want to choose one of posts, products, portfolio, etc, here are some steps for you to import them
Step 1 - Go to Tools >>> Import on your Dashbroad
Step 2 - Click to WordPress. Install plugin WordPress Importer
Step 3 - Choose .xml file you get to upload and import. Done!
IMPORTANT: If you press Import demo Content button once again later, it will not duplicate already existing content, which means that it is safe to do that. Menus are the only exception - menu items will be duplicated, even if they already exist.
You can quickly build single page, post, portfolio pages using Visual Composer for WordPress that is a drag-and-drop front-end and back-end page builder plugin to save you time, energy on the site content. You will be able to take full control over your WordPress site, build any layout you can imagine – no programming knowledge required
You don't know about Visual Composer? Please follow that: http://vc.wpbakery.com/video-academy/
Classic Mode
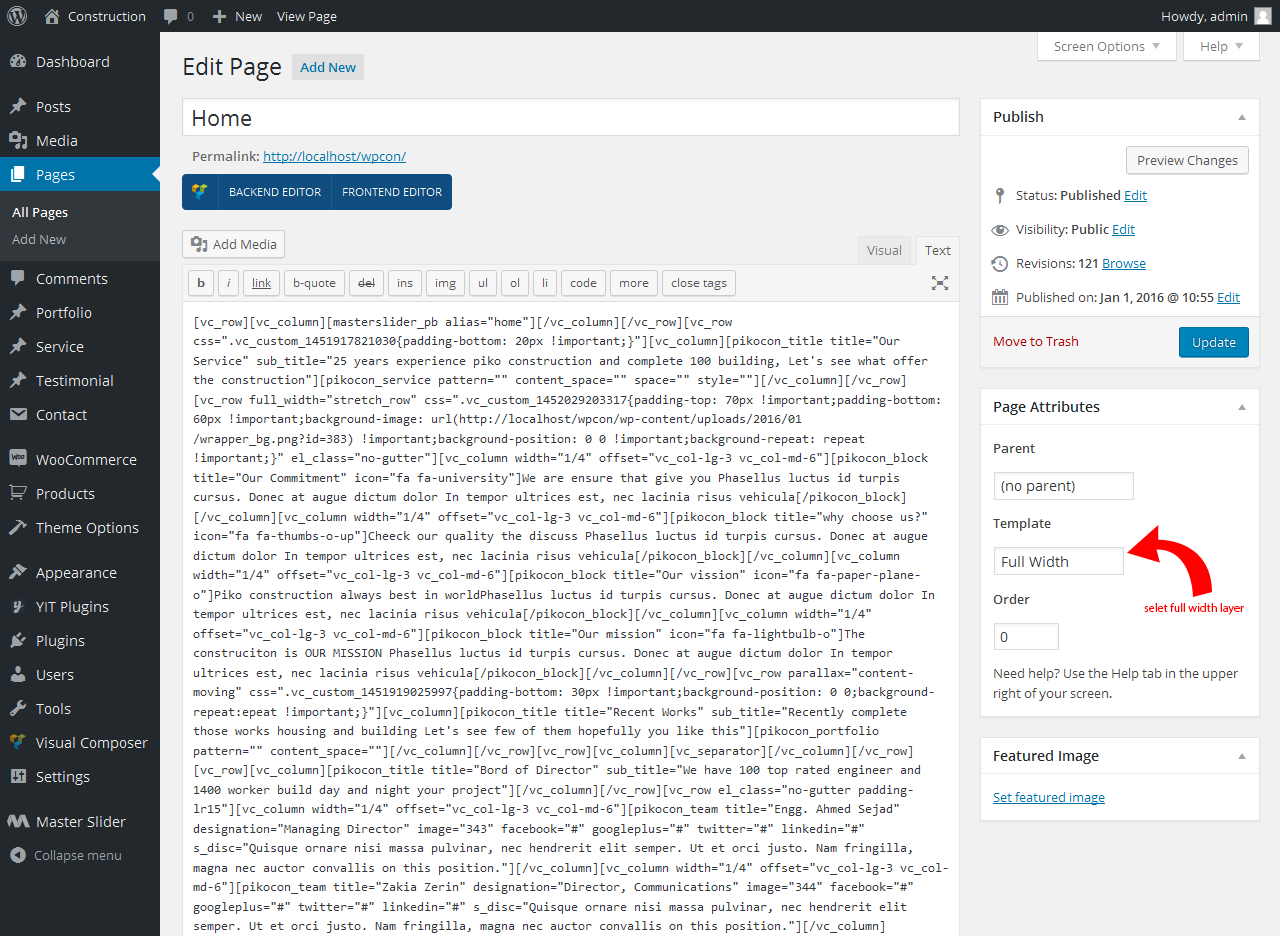
IMPORTANT: Please select the full Width Template
Backend editor mode
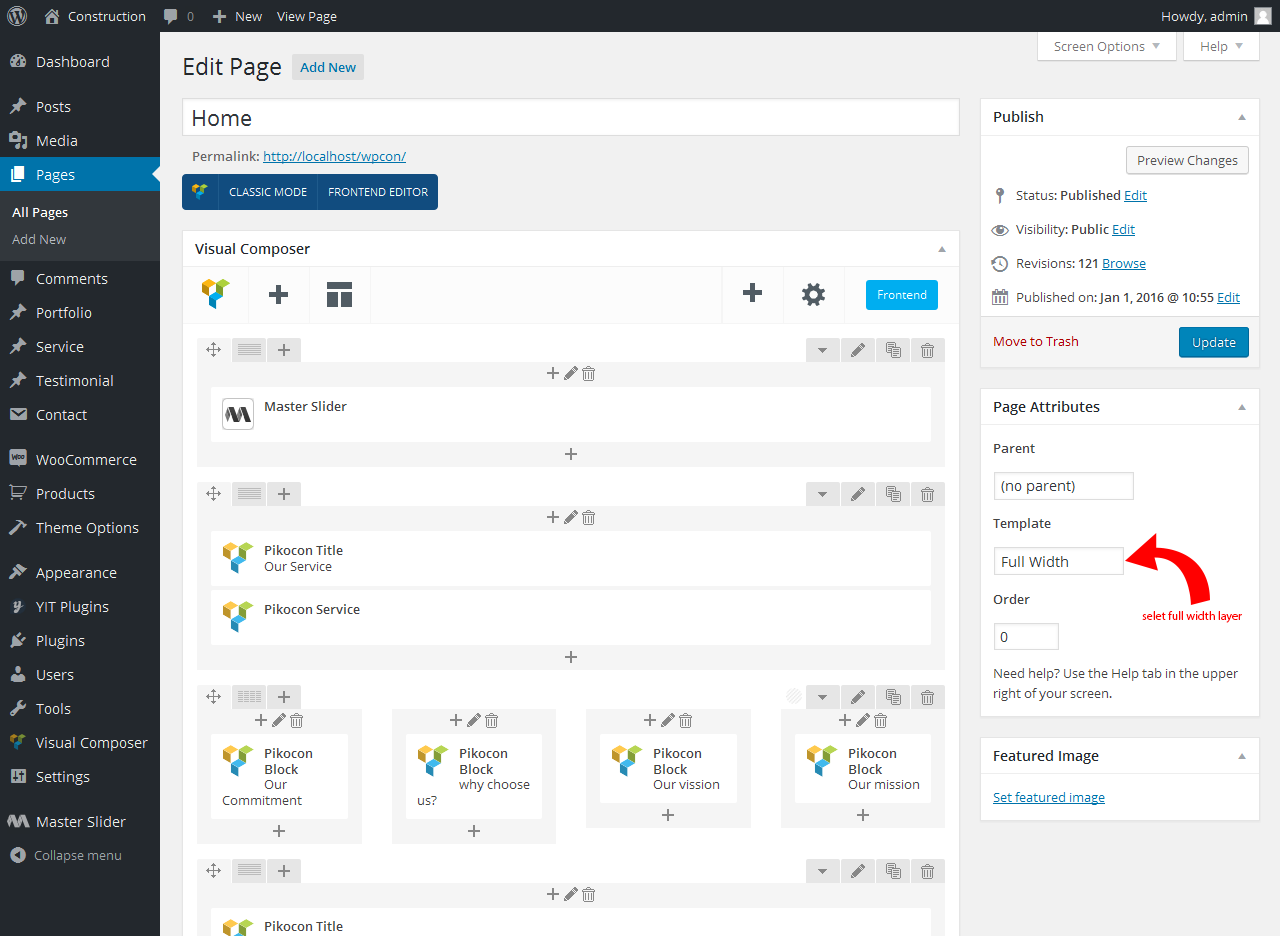
IMPORTANT: Please select the full Width Template
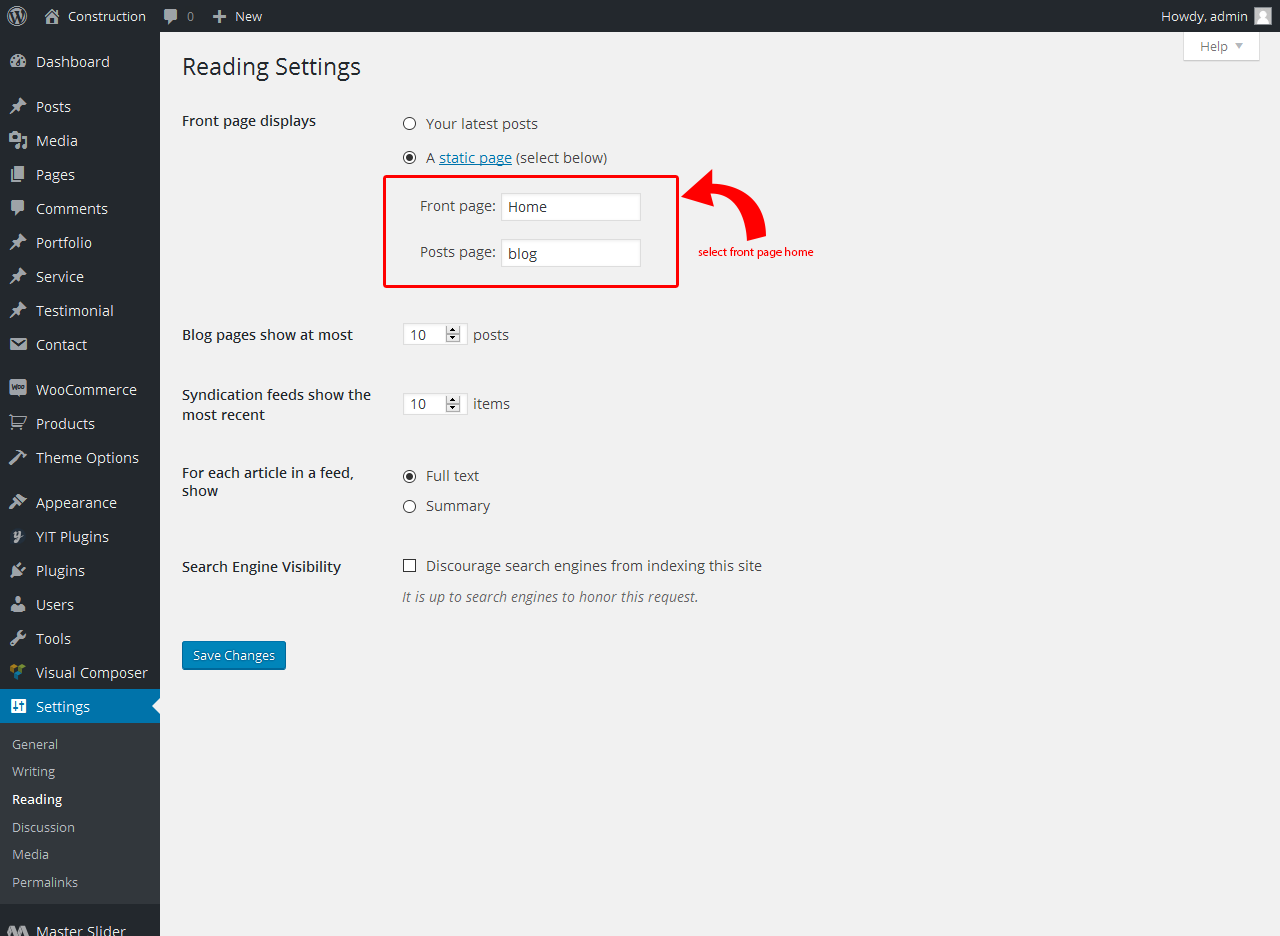
Set a page as homepage
To set one of pages created as home page, firstly go to Setting >>> Reading
To get started creating your first WordPress post, locate the Posts menu in the left-hand side of the WordPress Dashboard. You can either hover over the Posts link or click to expand it to reveal the submenu.
The Add New Posts can also be found from the New Postlink in the WordPress Admin Bar, also.
Click the Add New link.
The first box is where want to enter the title of your post. see image bellow

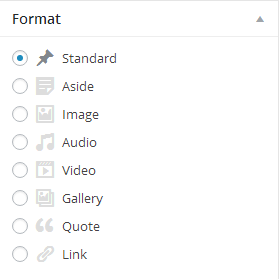
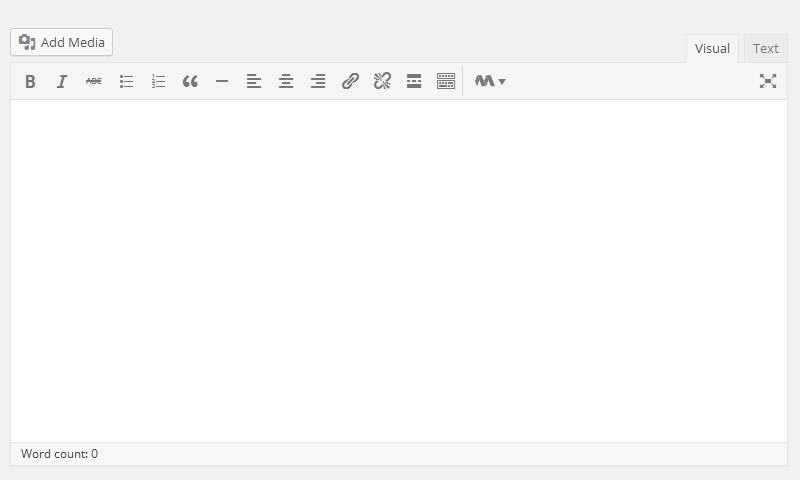
Next is the Post formatting section or post editor. This is where you will actually type the content of your post.
if the Video Post. Just the post and add the Embed video link bellow the description.
There are two pikocon of editing posts: Visual and Text.
The Visual tab will bring up the visual WYSIWYG editor. WYSIWYG just means what you see is what you getHere you see a formatting toolbar with lots of options for formatting your posts. If you're familiar with Microsoft Word or any other word processing software pikocon
If you click the Text tab, this will reveal a plain-text HTML version of the post editor. This version of the post editor is for editing the HTML code of your post. For pikocon user, the Visual editor is the easiest way to write posts. cause you are fimilar with ms word
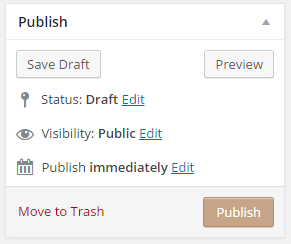
At the top of the right column on this screen you see the Publish box. Here, your can save your post as a draft if you like to save it for later. If you click the Preview button, you can get a preview of how the post will look once it's published.
The Status of the post will show if the post has been published, saved as a draft, if it's pending review of if it's been scheduled as you want.
The next two links show the visibility of the post or what visitors will be able to see your post. The Publish line shows whether the post will be published immediately or at a later date.
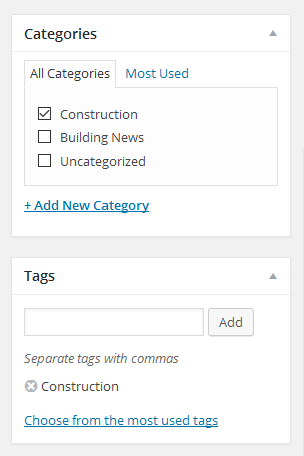
The next image you see for categories and tags assigned to your WordPress post.
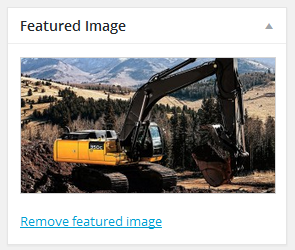
add the image Featured Image show the post thumbnail
If you like to change the screen options for your post editor, just click the screen options tab in the upper right hand corner. Expand this to reveal all the options that can be displayed on the post editor screen.
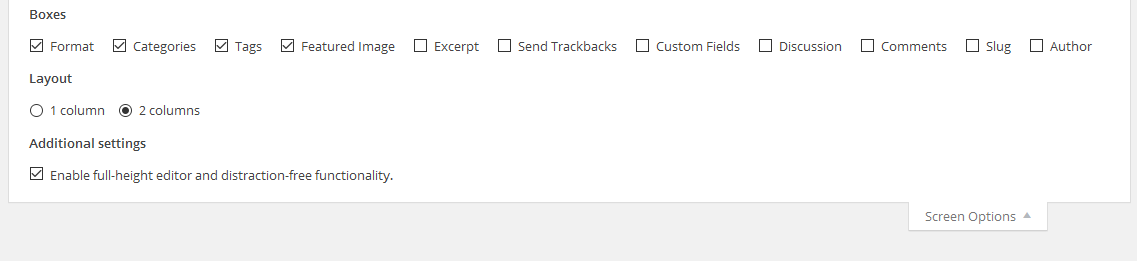
Again from the post editor, you can also drag or drop the order of these boxes to customize how we want them arranged on the page.
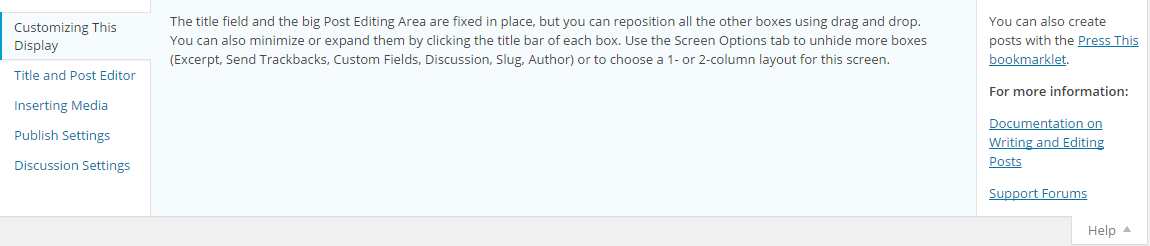
If you ever need help while you're on the Add New Posts page, just click the Help tab in the upper right corner. From here, you will be able to get a reminder for how to customize your post display, tips for adding a post title and using the post editor, inserting media and settings for publishing and discussion.
Add new service
where- Navigation to Service >>> Add New Service in Dashboard.
Service comes with similar with post formate just two different option added
Enter your Title: service Name
Service Description: Details your service WYSIWYG editor
Service image: use the Featured image(use all image the same size)
- Service single images
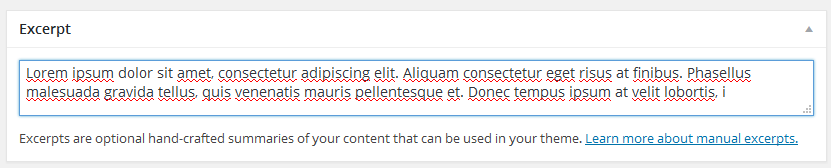
- Excerpt
Single page image mean: here you add multiple image this image show the service details page as a slider. if you use one image show only one image.
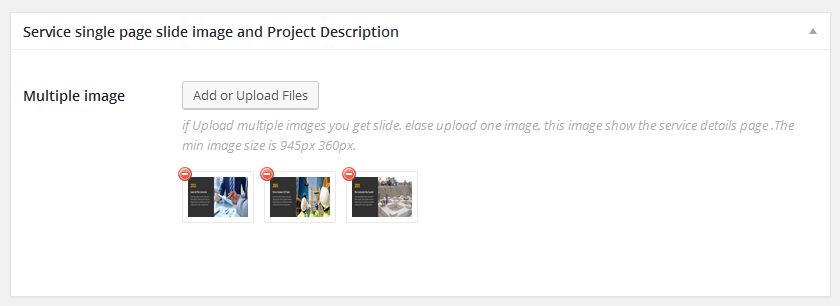
Excerpt: here you add short description your service that show post thumbnail caption and search result. if empty automatic call Service Description
Add new Portfolio
where- Navigation to Portfolio >>> Add New Portfolio in Dashboard.
Portfolio comes with similar with post formate just few different option added
Enter your Title: Portfolio Name
Portfolio Description: Details your portfolio WYSIWYG editor
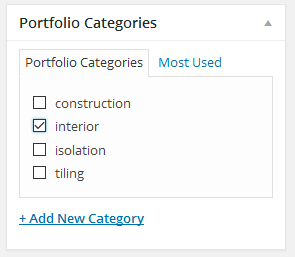
Portfolio Category: you must be use one category name(category name use for portfolio filtering)
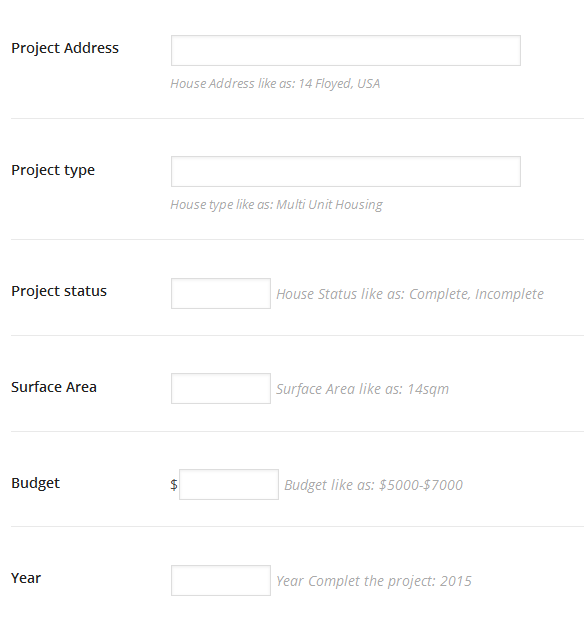
Portfolio image: use the Featured image(use all image the same size)
- Service single images
- Project Address, Project type, Project Status, Surface Area, Budget, Years
Single page image mean: here you add multiple image this image show the portfolio details page as a slider. if you use one image show only one image.
Other: here you add short description your project show the single page.
IMPORTANT:Must be select one category category name use for portfolio filtering
( don't select multiple category )..
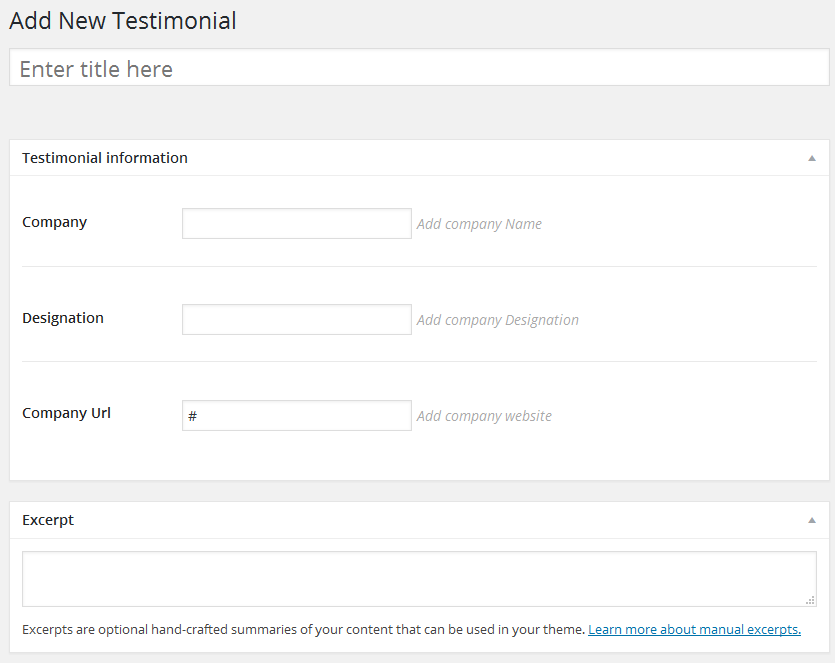
Add new Testimonial
where- Navigation to Testimonial >>> Add New Testimonial in Dashboard.
Enter your Title: Commenter Name
Company: Company Name
Designation: Add Commenter Designation
Company Url: add url Default add #
Expert: add Comment
Creating a WordPress Page
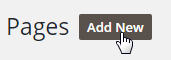
1. To get started adding a new page to your WordPress site, find the Pages menu in the WordPress Dashboard Navigation menu. Click Add new.
2. Add the title of the page, like About us. Note: If you have pretty permalinks set up, the title of your page will also be the URL slug.

3. Next, add some content your editor.
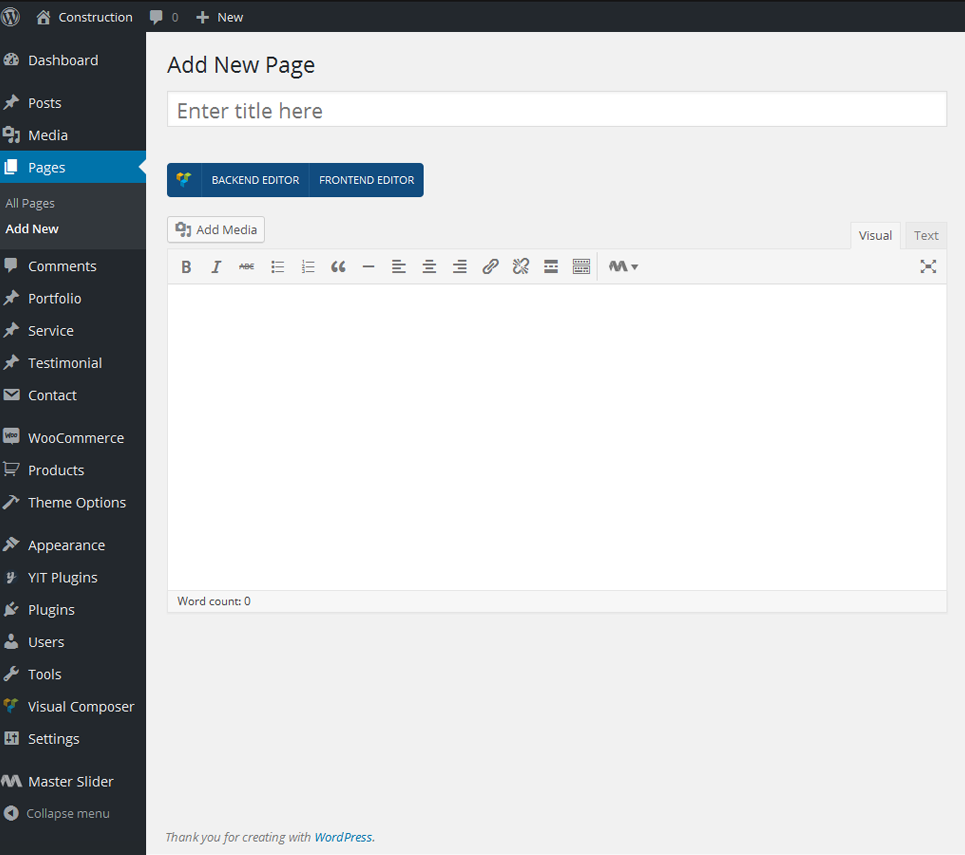
4. The Publish section of the page editor is exactly the same as for writing posts. When you're ready to publish, you can either publish immediately, save this or a draft, or schedule the page to be published later.
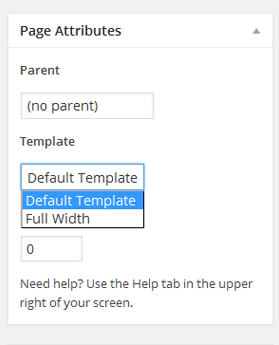
5. The Page Attributes section applies a parent page and template to your new page. For the Parent section, you can arrange your pages into hierarchies. For example, you could create this new page with additional pages under it. There are no limits to how many levels you can next pages all data save the database.
6. pikocon WordPress themes have custom page templates full width and Default, Default page include one sidebar so the next Template section allows you to apply a template to your new page.
7. Preview the page one last time, then click Publish. You've added a new page to your WordPress site.
Edit page using Visual Composer
You may already be familiar with it, but we will provide some explanation.
Full User Guide for WPBakery Visual Composer is located in Help Files folder.
IMPORTANT: Note that original user guide differs from theme's extended version in some cases. But you may still use it for reference in advanced cases.
Here is how it works:
In the Visual Composer editor pikocon give you Add element button, which you should click or drag to the working canvas, to add content block or row to your page.
Rows
Rows are used to divide your page into the logic blocks with columns, columns later will hold your content blocks. Rows can be divided into the layouts (eg. 1/2 + 1/2, 1/3 + 1/3 + 1/3, and so on). Your page can have unlimited number of rows. To change row's position, click and drag row';s drag handler (top left row's corner) and drag row around (vertical axis).
Columns
Columns are part of the row and they hold your content elements inside them. Columns can be reordered. Click and drag column around (horizontal axis). That way you can group elements in logical groups and then drag them around with your re-position.
Content Elements
Content Elements This is a list of available content elements that can be placed on the working canvas or inside of the columns. Think of them as bricks. With those bricks you are building your layout. pikocon of the content elements have options, to set them click pencil icon. To save changes click save button.
Here is how to use it in Pikocon:
- Create a page and press Backend Editor button
- Click Add Element or Row (when you click add element it is placed automatically into the row)
- On some elements setting screen pops up first, choose your settings and insert element
- To edit element later click on pencil button
- Drag elements to reorder them
Some specific element explanations:
For More instructions, please go to plugin docs here: https://wpbakery.atlassian.net/wiki/pages/viewpage.action?pageId=4030510
Pikocon use all design aliment the visual composer drag and drop
- Page Title
- Counter block
- Thumbnail Design with caption
- Brand logo Carousel
- Team Member
- Testimonial
- shop
- service
- Portfolio
- Pricing table
- Icon with content
- Quote with button
- Google Map
Creating a WordPress demo sample page here the shortcode below the pikocon use
With pikocon, you can create any homepage in the most creative way possible, thanks to a large number of shortcodes and flexbile layouts from the theme.
Here we provide you some demo homepages, each comes with different style and purpose:
SAMPLE PAGES
Piko Construction provides you a great, number of sample pages and layout, which help you create an impressive website on your own:
Homepage
You can insert the following code into the back-end's visual section:
Homepage2
About us
Contact us
Widget About us add widget text and copy this code content area
Widget Working Hours add widget text and copy this code content area
Please see Woocommerce documentation for help with using Woocommerce:http://docs.woothemes.com/documentation/plugins/woocommerce/
How To Create Your Products
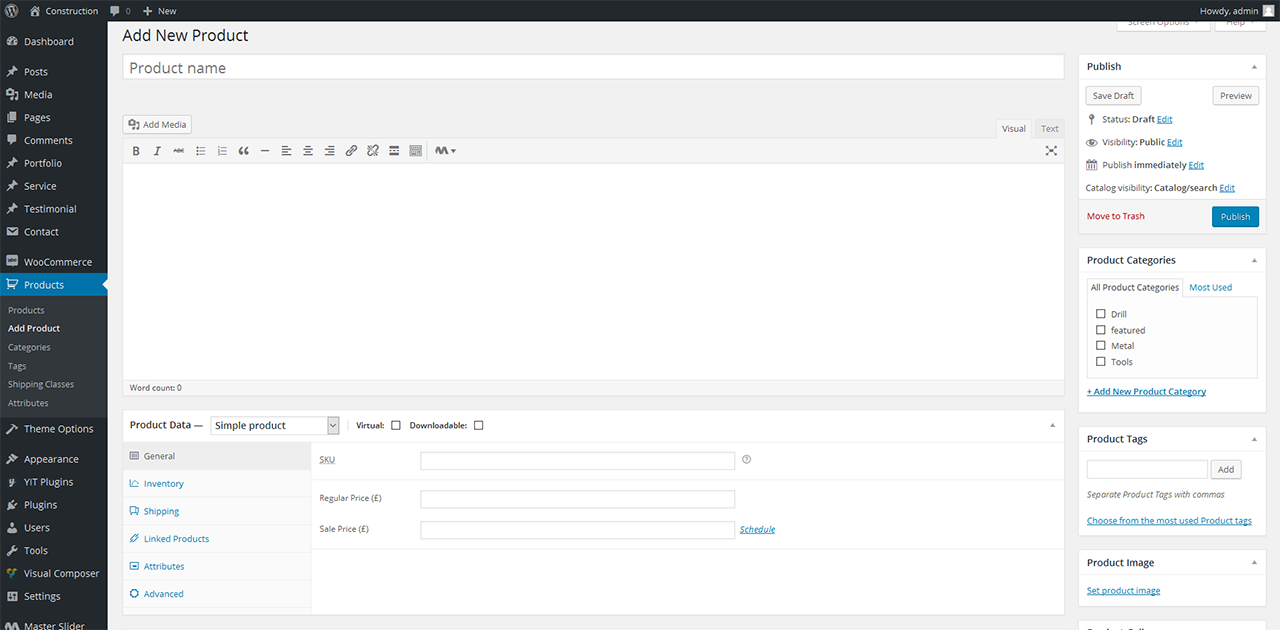
- Step: In the dashboard, Click on the Products sidebar menu and click on “Add Product” button. Enter a name for your product.
- Step: Write the product description into the post content field, this will be all the product information.
- Step: You enter the product information price, SKU, shipping, and more) into the “Product Data”.
- Step: The “Product Short Description” permit you to write the short information about product.
- Step: Set “Featured Image” in the right sidebar.
- Step: When all manipulations are finished, click “Publish” to show on your main shop page.
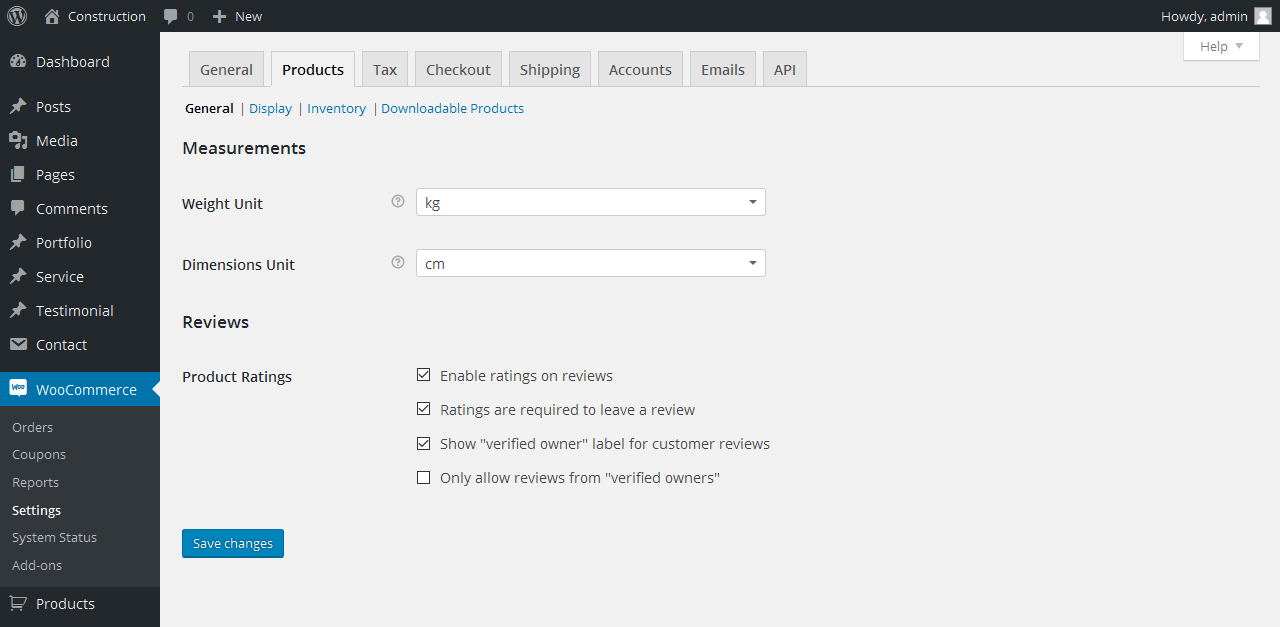
How To Adjust Shop in Piko Construction
- Step: Click on the WooCommerce menu item on your Dashboard
- Step: Click on “Product” tab. There is a “Product Listings, Product Data, Product Image Size & Downloadable Products”.
- Step: The “Product Listings” is where you can select options to show products.
- Step: In Product Image Size section, Catalog Image is for your images on the shop page and for shortcodes. Single Product Image is for your images on the single product pages. Product Thumbnail is for your smaller product thumbnail for widgets.
- Step: Set “Featured Image” in the right sidebar.
- Step: When all manipulations are finished, click “Publish” to show on your main shop page.
Where: Left sidebar menu >>> Theme Option
Each option in the admin panel is pretty well described there and easy to use already, so we will just go through the sections in short so you can get an idea of the overall structure - and point out the important things.
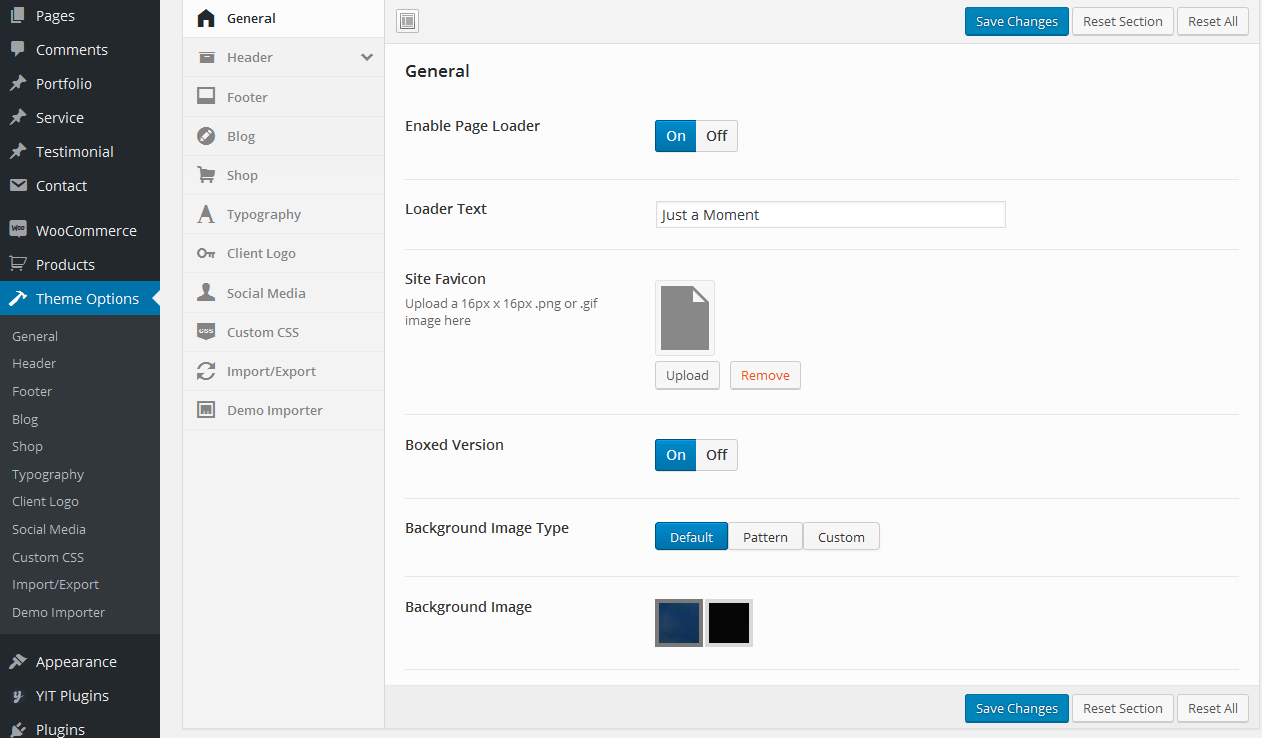
GENNERAL OPTIONS
- Enable Page loader[with loader text]
- Site favicon upload
- Enable Boxed Version
A favicon (favorite icon) is a small icon that represents your website and provides a shortcut to it wherever the icon appears (for example, in bookmarks or search results.)
The ideal size of a favicon is 16x16 pixels. You should save your favicon as either favicon.png or favicon.ico.
Boxed version you can choose background image, pattern, and custom option as you want width use the 1200px default boxed version
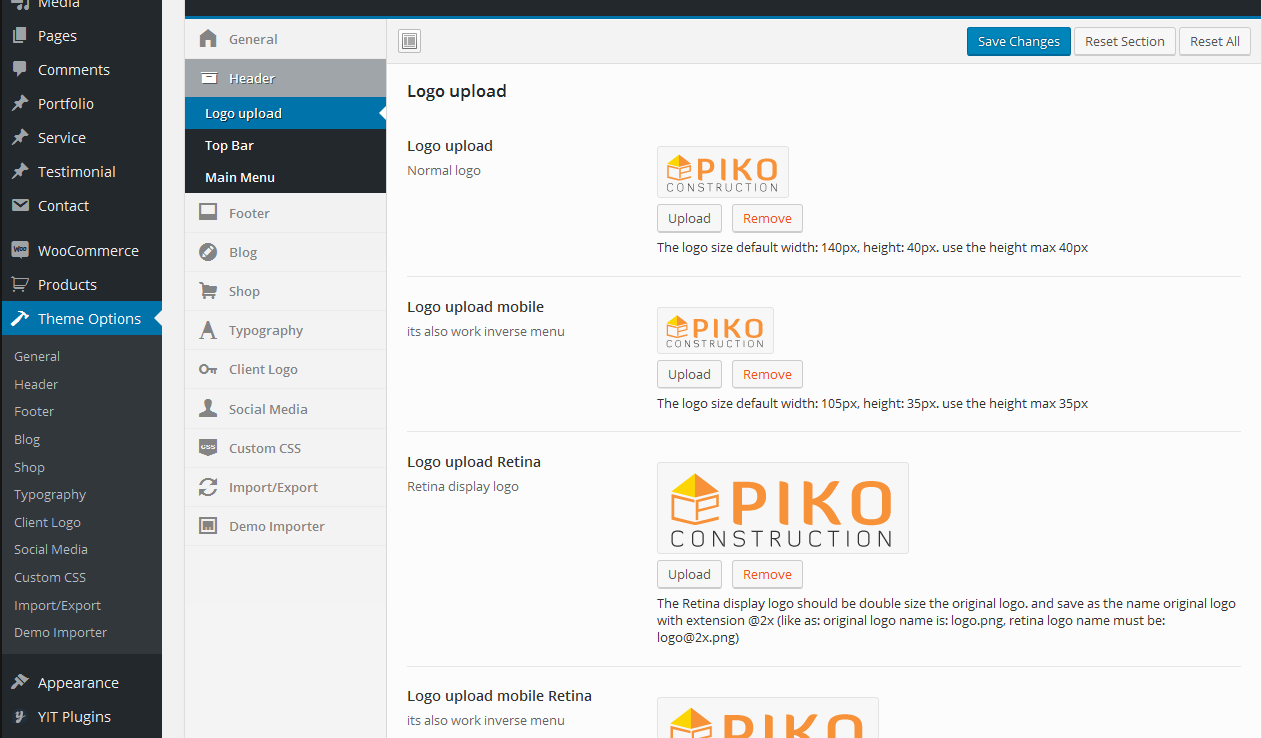
Logo Upload:
To change the logo image, you can either use your own existing logo image or edit the included logo PSD file - it is called logo.psd
After you have your logo image, go to theTheme Option >>> Header>>> Logo Upload Then Upload your desired logo or header image.
You save your favicon as either a favicon.png or a favicon.ico file. The same article will show you what artwork works well in such a small size. like your logo create the favicon visit the web http://www.favicon-generator.org/
Top Bar:
Option Available
Where: Theme Option >>> Header>>> Top Bar
- Enable Top Bar
- Enable Top Bar WPML Switcher
- Enable Boxed Version
- Select Social Media Icons to display topbar left side
- Top Bar right side Option
- Login Info
- contact info Info
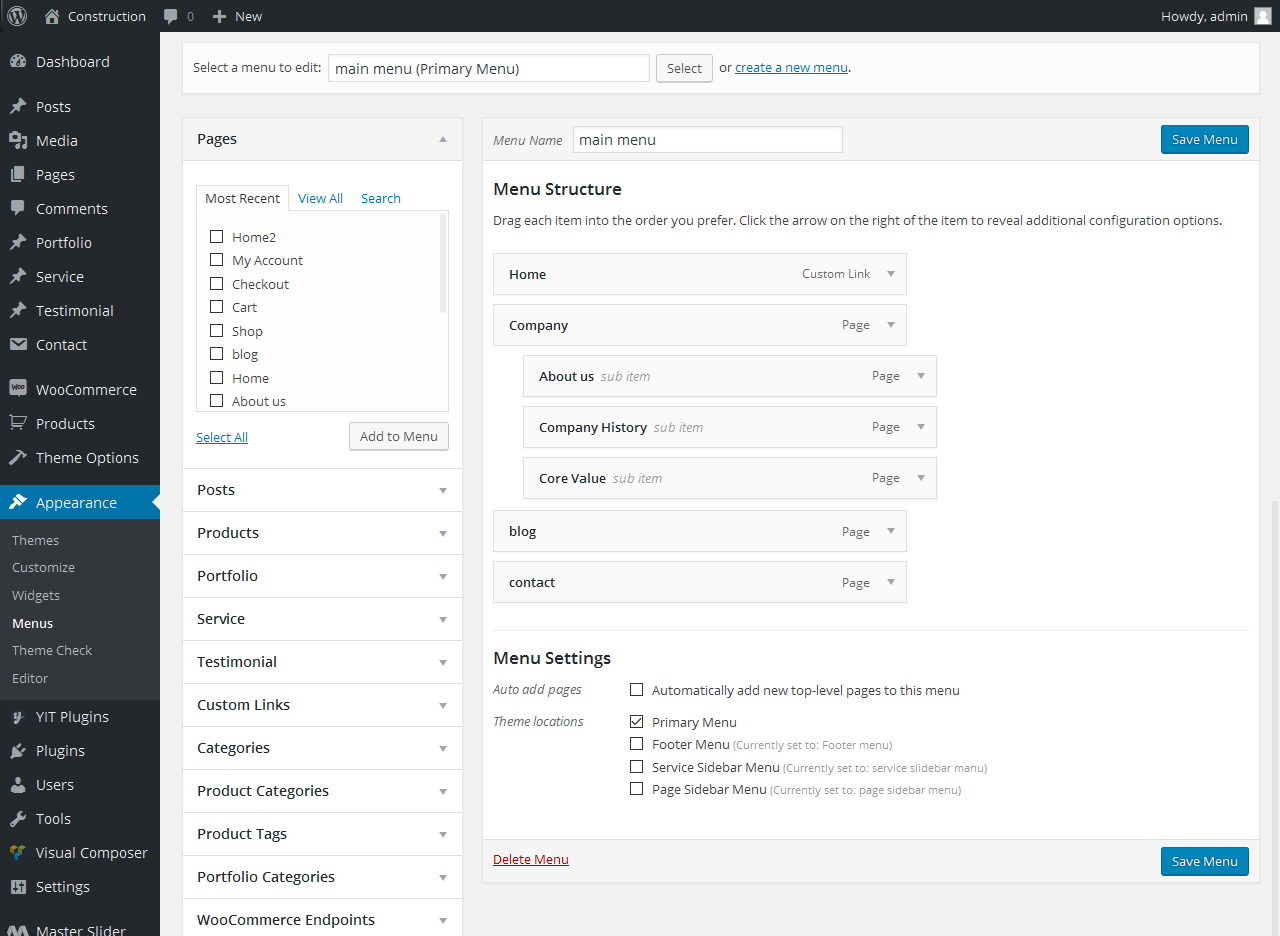
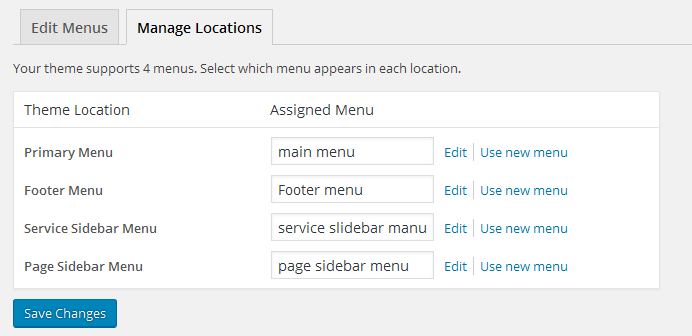
Main Menu:
Option Available
Where: Theme Option >>> Header>>> Main Menu
- Menu Style
- Style 1
- Style 2
- Style 3
- Enable Social Icon. Style 2 and style 3 available option main menu social icon enable and style 1 social icon called top bar social option
- Enable Menu Dark
- Enable Full width Menu
- Disable the Search the icon Menu Bar
- Enable fixed header on scroll.
- Enable Top Bar Social Media icons
- Manu Hover line
- Mobile Menu
Page Title Bar:
Page Title Bar
Where: Theme Option >>> Page Title Bar
- Page title & Breadcrumb Color
- Breadcrumb Active Color
- Bankground Color
- Page title Background image Enable Page title Background image.
-
- Page Title Bar Background image upload
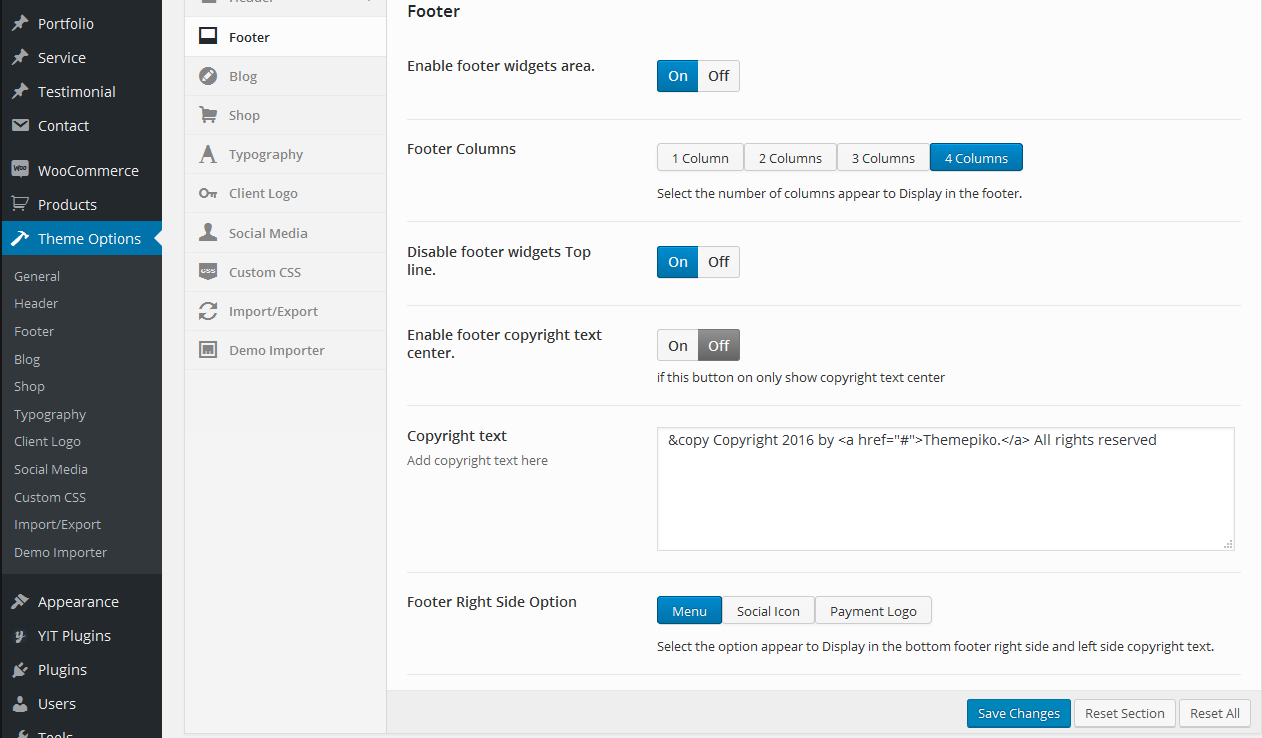
Footer Option:
Footer
Where: Theme Option >>> Footer
- Enable footer widgets area.
- Footer Columns
- Disable footer widgets Top line.
- Bottom Footer Enable footer copyright text center.
-
- Edit Copyright text
- Footer Right Side Option[select one]
- Menu
- Social icon
- Payment logo
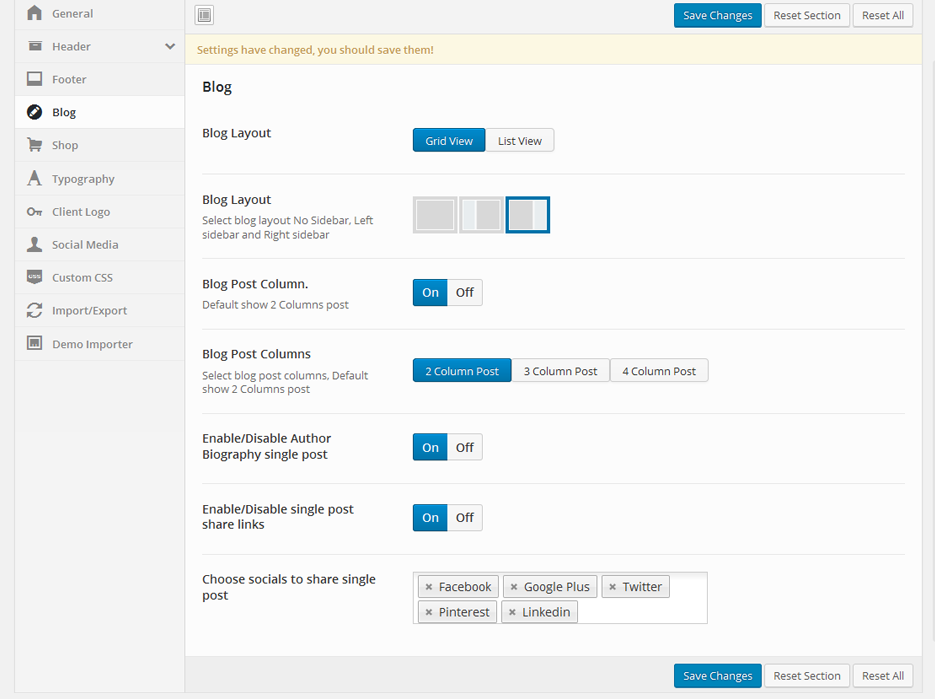
Blog:
Where: Theme Option >>> Blog
- Blog Layout
- Blog Layout Sidebar
- Blog Post Column.
- Enable/Disable Author Biography single post
- Enable/Disable Author Biography single post
- Enable/Disable single post share links
- Choose socials to share single post
Color Skin:
Color Skin
Where: Theme Option >>> Color Skin
- Choose predefined Color skin
- Custom Color choose your color skin
Shop:
Where: Theme Option >>> Shop
The same option available like as blog
Typography:
Where: Theme Option >>> Typography
- Body Font Select Google custom font for your main body text.
- Heading Font Select custom font for headings
- Heading Font Size Select heading font size
Client Logo:
Where: Theme Option >>> Client Logo
You can upload your client logo here
Social Media:
Where: Theme Option >>> Social Media
Put your social media link here this link use for social icon topbar and footer
Custom Script:
Where: Theme Option >>> Custom Script
Put your Custom Script here css and js
Import/Export:
Where: Theme Option >>> Import/Export
Put your Import/Export data Here you can copy/download your current option settings. Keep this safe as you can use it as a backup should anything go wrong, or you can use it to restore your settings on this site (or any other site).
Demo Importer:
Where: Theme Option >>> Demo Importer
one click Demo Importer full size piko construction Details menu Demo content Instruction Menu left side serial 3 also you can import manually we put the demo page code like homepage1, homepage2, about us and content us. (where: menu item 10, demo page)
Pikocon includes the popular Master slider created on WP. This slider is a beautifully animated slider that is 100% responsive and has some amazing options. We cannot cover everything here but we outline how to setup a slider and how to add slides to it.
To Create A New Master Slider.
Where: Master Slider >>> Create New slider >>> Slider Type >>> Custom Slider >>> Add Slide
Full Documentation here http://masterslider.com/doc/wp
Translation Basics
If you are new to translating WordPress, this is the right point to start. In general, internationalization and localization (abbreviated as i18n and l10n respectively) are terms used to describe the effort to make WordPress available in languages other than English, for people from different locales. The actual localization is done using the GNU get text framework, which is used by WordPress itself including the themes and plugins.
In order to make WordPress recognize the language to which you want to translate the core WordPress, the theme or the plugins, you have to define the language within the wp-config.php file or change a setting within the dashboard. The process is dependent on the WordPress version and is described below:
- Login to your FTP account and edit the wp-config.php file. In the wp-config.php file, look for WPLANG constant which looks like the following code:
- More Information click here codex instruction
       <?php
     /*
    *WordPress Localized Language, defaults to English.
    * Change this to localize WordPress.
    * language must be installed to wp-content/languages. For example, install
    * language support.
    */

    define( 'WPLANG', '' );

     ?/>
For WordPress 4.0 or 4.0+ Users
After the wp-config.php file is edited, login to WP-admin dashboard and navigate to Settings >>> General Setting >>> page. Make sure Site Language option is set correctly.
To translate the theme please follows the steps below:
Copy Pikocon.pot file from pikocon/languages folder to your desktop for editing.
Download http://www.poedit.net/ and open the file with it.
Choose the text to edit and enter your translation in the bottom box.
Save your .po file according to language code followed by country code If your translation is written in German, your file name will look like de_DE.po
Once you save, Poedit by default automatically creates a .pikocon file along side your .po file.
Upload the .po and .pikocon files you just created to your /languages folder so they are in the same directory as the pikocon.po
Open wp-content; folder and and create /languages folder, if it is not already there.
Upload the WordPress .pikocon file corresponding to the desired language ( de_DE.po for example) into your /languages folder
In Settings/General scroll to the last setting and choose the language.
Done
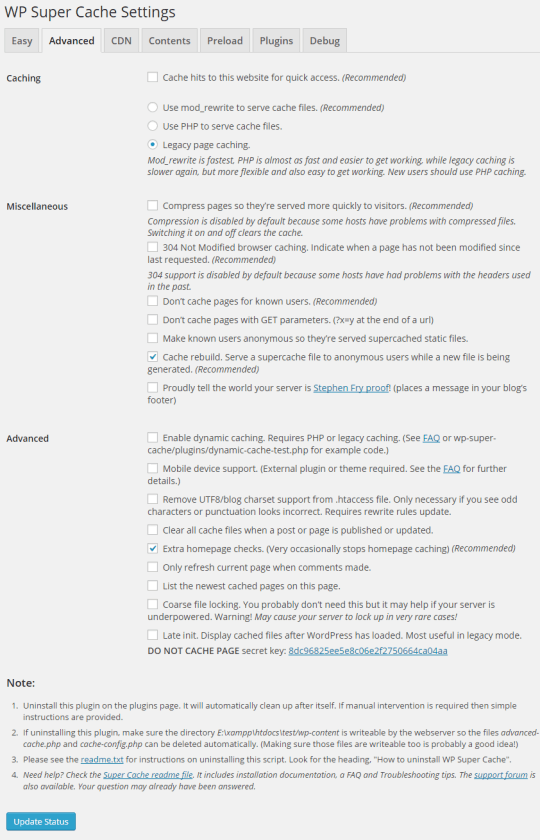
How To Speed Up Your Site With WP Super Cache
plugin link WP SUPER CACHE
WP Super Cache is a plugin for WordPress that generates static HTML pages from your dynamic WordPress blog. Once static pages are generated, those pages are displayed to visitors, using less server resources than dynamic webpages.
For busy websites running WordPress, we recommend to enable a caching plugin, such as WP Super Cache. This will allow your website to handle simultaneous visitors and also typically loads much faster than without the caching plugin.
Configuration and Settings
Please complete all four steps to use the suggested settings.
tep 1. Set General Settings
On Advanced tab, you should either select Use _rewrite to serve cache files or the 304 Not browser caching as the recent updates to the WP Super Cache Plugin have made their use un-accessible at this time.
- Check box next to Cache hits to this website
- Select button next to Use rewrite to serve cache files
- Check box next to Compress Pages
- Check box next to 304 Not browser caching
- Check box next to Don't cache pages for known users
- Cache rebuild; Extra homepage checks; should already be checked, leave them that way.
- Select Update Status button.
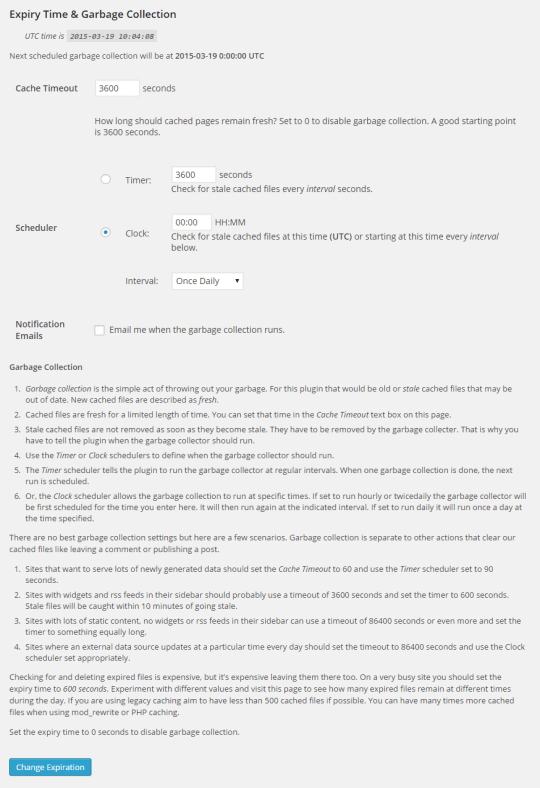
Step 2. Set Garbage Collection
Scroll down to Expiry Time Garbage Collection and enter 3600 in the box, then select Change Expiration
Step 3. Set Rejected User Agents
It is recommended that you do not the default user agents from the list, to prevent bots from caching content and pages not normally seen by your visitors.
Explanation of the Options Selected
Cache hits to this website
Enables caching
Use rewrite to serve cache files
Fastest caching method, uses rewrite rules in client's .htaccess file
Compress Pages
Super Cache files are compressed and stored that way so the heavy compression is done only once. These files are often much smaller. They are sent to a visitor’s browser much faster than uncompressed html. As a result, the server spends less time talking over the network. It saves CPU time and bandwidth, and can also serve the next request with much high speed.
304 Not browser caching
Indicates to the client’s browser whether a requested file has been or not (see: http://www.addedbytes.com/for-beginners/http-status-codes/ or elsewhere for info on that apache code)
Don't cache pages for known users
This prevents logged-in users from being served cached pages and is the default for al every caching plugin out there.
Expiry Time Garbage Collection
The default setting will allow cache files to age 1 hour (3600 seconds) prior to being which is ideal. This setting can be increased for sites that do not have many posts (1,000 or less ) if you do not update your content often. If you have a very large of posts ( 25,000+ ), a lower setting around 1800 may be pikocon viable to prevent stat/CPU issues due to the pikocon of files being created.
Rejected User Agents
It is recommended that you do not the default user agents from the list, to prevent bots from caching content and pages not normally seen by your visitors. (For example, if you have a calendar, a real visitor may only browse close to now, but a bot will index every forever as if it is a different page. Caching these pages real visitors are unlikely to visit wastes resources.)
Themepiko Service:
- Complete theme installation
- Exact look feel as the live pikocon
- Full suite of Bean WordPress Plugins
Themepiko Deliverables:
- Domain name
- FTP information
- WordPress admin credentials
- Theme files or purchase code
Details
Our in-house team of professional developers will install the theme, upload the pikocon XML file, and setup your website exactly like the live pikocon.
Complete your purchase of the Premium Installation service by clicking the button above and send us your deliverables.
Email: themepiko@gmail.com
Version 1.0 -2020/03/18
- Initial Release